Showing posts with label ndk. Show all posts

Saturday, May 21, 2016

Compiling POCO libraries for Android


Create a standard toolchain

http://developer.android.com/ndk/guides/standalone_toolchain.html


$NDK_ROOT/build/tools/make-standalone-toolchain.sh \
--arch=arm --platform=android-18 --toolchain=arm-linux-androideabi-4.8 --install-dir=/Users/saba/azhar/work/android/POCO/poco-android-toolchain

————————————————————————
On El-Captain Install the openssl (openssl should be already present on a linux system)

brew install openssl
brew link openssl --force


————————————————————————

POCO build complete edition with NetSSL_OpenSSL and Crypto(without ODBC and MySQL)

cd /Users/ss/aa/work/android/POCO/poco-1.6.1-all_Shared

export PATH=$PATH:/Users/ss/aa/work/android/POCO/poco-android-toolchain/bin

./configure --config=Android --no-samples --no-tests --omit=Data/ODBC,Data/MySQL --include-path=/usr/local/Cellar/openssl/1.0.2d_1/include --library-path=/usr/local/Cellar/openssl/1.0.2d_1/lib

make -s -j4
————————————————————————

POCO build basic edition 

cd /Users/ss/aa/work/android/poco-1.6.1

export PATH=$PATH:/Users/ss/aa/work/android/POCO/poco-android-toolchain/bin

./configure --config=Android --no-samples --no-tests

make -s -j4

————————————————————————

By default POCO will compile static libs (.a) files but yet I haven't been able to successfully create a JNI wrapper to use functions available in static libs. So I compiled the shared libs and used them.

To generate shared libs open the below make file
/Users/ss/aa/work/android/POCO/poco-1.6.1-all_Shared/build/config/Android 

and change from

LINKMODE           ?= STATIC

to

LINKMODE           ?= SHARED


After the complete POCO libs are built they should be available in lib folder present under Root of POCO  (poco-1.6.1-all_Shared and poco-1.6.1 in my case)

Although I could generate all static libs, I could not generate the libPocoNetSSL.so lib.
I guess it was because the openssl lib that the POCO code referes to was using a static lib on MAC and creating a shared lib using static lib was causing some problem.

I speculate that the problem should not exist on a linux machine. Will try out soon and post the results.

————————————————————————

Do a clean up of POCO

make clean
rm -f -R lib
popd

rm -f -R Platform/Android/lib

rm -f -R Platform/iOS/lib

rm -f -R Platform/MacOS/lib

rm -f -R Build/iOS

rm -f -R Build/Android

rm -f -R Build/Darwin

————————————————————————
System 

OS X El Capitan
————————————————————————


Reference : -

http://pocoproject.org/docs/99300-AndroidPlatformNotes.html 


Thursday, May 28, 2015

Using libyuv prebuilt shared library in Android

In my previous post I explained how to build libyuv shared library  now I would like to explain how to write a JNI wrapper and access the libyuv functions available.

Please go  through the above post before proceeding, as I'll be frequently referring to it.

From the post above, If you have successfully built the libyuv shared library then you should see the .so's generated at the location :-
LRD/libs/armeabi/libyuv_shared.so
LRD/libs/armeabi-v7a/libyuv_shared.so
LRD/libs/mips/libyuv_shared.so
LRD/libs/x86/libyuv_shared.so

We'll be needing the .so's, for the JNI wrapper will be accessing the functions present in it.


Create the following directory structures in your workspace:-


LibYUVDemo/prebuilt/
LibYUVDemo/include/
LibYUVDemo/jni/


Under the LibYUVDemo/prebuilt/ directoy paste the libyuv_shared.so files in the respective order :-

LibYUVDemo/prebuilt/armeabi/libyuv_shared.so
LibYUVDemo/prebuilt/armeabi-v7a/libyuv_shared.so
LibYUVDemo/prebuilt/mips/libyuv_shared.so
LibYUVDemo/prebuilt/x86/libyuv_shared.so

Copy the contents of include folder from libyuv source and paste it under
LibYUVDemo/include/ 

Now the actual JNI wrapper, create LibYUVDemo.cpp under
LibYUVDemo/jni/ and write a jni function as follows :-

#include <jni.h>
#include <string.h>
#include <stdlib.h>
#include "libyuv.h"
#include <android/log.h>

#define LOG_TAG "YUVDemo"
#define LOGI(...) __android_log_print(ANDROID_LOG_DEBUG, LOG_TAG, __VA_ARGS__)
#define printf(...) LOGI(__VA_ARGS__)

using namespace libyuv;

extern "C" {
JNIEXPORT void Java_com_demo_libyuvdemo_MainActivity_callLibYUV(JNIEnv* env, jobject thiz) {

libyuv::RotationMode mode = libyuv::kRotate180;

/*libyuv::ConvertToI420(const unsigned char *, unsigned int, unsigned char *, int, unsigned char *, int, unsigned char *, int, int, int, int, int, int, int, enum libyuv::RotationMode, unsigned int);
 */
    printf("rotation mode selected = %d",mode);
}

Create an Android.mk file under LibYUVDemo/jni/
LOCAL_PATH := $(call my-dir)

include $(CLEAR_VARS)
LOCAL_MODULE    := yuv_shared
LOCAL_SRC_FILES := ../prebuilt/$(TARGET_ARCH_ABI)/libyuv_shared.so
ifneq (,$(wildcard $(LOCAL_PATH)/$(LOCAL_SRC_FILES)))
include $(PREBUILT_SHARED_LIBRARY)
endif


include $(CLEAR_VARS)

LOCAL_MODULE    := YUVDemo
LOCAL_SRC_FILES := LibYUVDemo.cpp
#LOCAL_SRC_FILES := LibYUVDemo.c


#
# Header Includes
#
LOCAL_C_INCLUDES := \
            $(LOCAL_PATH)/../include
#
# Compile Flags and Link Libraries
#
LOCAL_CFLAGS := -DANDROID_NDK

LOCAL_LDLIBS := -llog
LOCAL_SHARED_LIBRARIES := yuv_shared

include $(BUILD_SHARED_LIBRARY)
Finally create an Application.mk file under LibYUVDemo/jni/

APP_ABI := all
APP_PLATFORM := android-9
APP_STL := stlport_shared

Now navigate to LibYUVDemo/jni/ from command prompt and trigger ndk-build, the JNI should get compiled and you must have the new .so geneated at LibYUVDemo/libs/ for the all the architectures.


A complete working app is available at github.

Thursday, May 21, 2015

Building libyuv shared library for Android

         Recently for my project I wanted to rotate NV21 raw data obtained from device camera when the device is held in portrait mode. Sadly android does not provide any API that alters the raw data it provides through the onPreviewFrame callback, so was looking for a way to rotate the NV21 by 90 degrees and libyuv came to the rescue.

Prerequisites:-
  1. NDK setup must be done, and you must be able to compile sample ndk-apps provided in the android-ndk.
  2. Download the libyuv codebase, do an SVN checkout from here.
The directory that gets created once you do SVN checkout is the libyuv root directory, am going to refer it as LRD (LIBYUV_ROOT_DIR).
LRD contains an Android.mk file which we are going to use to build our shared library (of-course some modifications would be needed).

Once the above prerequisites have been met, then proceed with the following steps to build the shared library:-
  • Create a jni folder in LRD.
  • Copy the Android.mk file to it.
  • Create an Application.mk file and add the following lines to it. 
APP_PLATFORM := android-9
APP_ABI := all
  •  Modify the Android.mk file as below to point to the source code correctly
# This is the Android makefile for libyuv for both platform and NDK.
LOCAL_PATH:= $(call my-dir)

include $(CLEAR_VARS)

LOCAL_CPP_EXTENSION := .cc

LOCAL_SRC_FILES := \
    $(LOCAL_PATH)/../source/compare.cc           \
    $(LOCAL_PATH)/../source/compare_common.cc    \
    $(LOCAL_PATH)/../source/compare_neon64.cc    \
    $(LOCAL_PATH)/../source/compare_posix.cc     \
    $(LOCAL_PATH)/../source/convert.cc           \
    $(LOCAL_PATH)/../source/convert_argb.cc      \
    $(LOCAL_PATH)/../source/convert_from.cc      \
    $(LOCAL_PATH)/../source/convert_from_argb.cc \
    $(LOCAL_PATH)/../source/convert_to_argb.cc   \
    $(LOCAL_PATH)/../source/convert_to_i420.cc   \
    $(LOCAL_PATH)/../source/cpu_id.cc            \
    $(LOCAL_PATH)/../source/planar_functions.cc  \
    $(LOCAL_PATH)/../source/rotate.cc            \
    $(LOCAL_PATH)/../source/rotate_argb.cc       \
    $(LOCAL_PATH)/../source/rotate_mips.cc       \
    $(LOCAL_PATH)/../source/rotate_neon64.cc     \
    $(LOCAL_PATH)/../source/row_any.cc           \
    $(LOCAL_PATH)/../source/row_common.cc        \
    $(LOCAL_PATH)/../source/row_mips.cc          \
    $(LOCAL_PATH)/../source/row_neon64.cc        \
    $(LOCAL_PATH)/../source/row_posix.cc            \
    $(LOCAL_PATH)/../source/scale.cc             \
    $(LOCAL_PATH)/../source/scale_any.cc         \
    $(LOCAL_PATH)/../source/scale_argb.cc        \
    $(LOCAL_PATH)/../source/scale_common.cc      \
    $(LOCAL_PATH)/../source/scale_mips.cc        \
    $(LOCAL_PATH)/../source/scale_neon64.cc      \
    $(LOCAL_PATH)/../source/scale_posix.cc       \
    $(LOCAL_PATH)/../source/video_common.cc

# TODO(fbarchard): Enable mjpeg encoder.
#   source/mjpeg_decoder.cc
#   source/convert_jpeg.cc
#   source/mjpeg_validate.cc

ifeq ($(TARGET_ARCH_ABI),armeabi-v7a)
    LOCAL_CFLAGS += -DLIBYUV_NEON
    LOCAL_SRC_FILES += \
        $(LOCAL_PATH)/../source/compare_neon.cc.neon    \
        $(LOCAL_PATH)/../source/rotate_neon.cc.neon     \
        $(LOCAL_PATH)/../source/row_neon.cc.neon        \
        $(LOCAL_PATH)/../source/scale_neon.cc.neon
endif

LOCAL_EXPORT_C_INCLUDES := $(LOCAL_PATH)/../include
LOCAL_C_INCLUDES += $(LOCAL_PATH)/../include

LOCAL_MODULE := libyuv_static
LOCAL_MODULE_TAGS := optional

include $(BUILD_STATIC_LIBRARY)
  • Open command prompt (on Windows) or Terminal in Linux or MAC, navigate to LRD/jni and type ndk-build
  • This should trigger the build process and if all goes well the libyuv_static.a (a static library) will get created inside LRD/obj/local/armeabi/
  • But we cannot use a static library with android  so we need to generate a shared library (.so),  for that simply modify the following tags as below (Android.mk file)
LOCAL_MODULE := libyuv_shared
include $(BUILD_SHARED_LIBRARY)
  • Again trigger ndk-build to generate the .so at LRD/libs/
Now the shared library obtained above has all the functions exposed like ConvertToI420,I420Rotate etc......


To check the functions available use the following command on Linux or MSYS(for windows)
 nm -C -D libyuv_shared.so

In my next post I'll try to show how to write a JNI wrapper to use the libyuv shared library.


Thursday, September 29, 2011

Android NDK

After a lot of googling, and going through some tutorials i could finally setup theAndroid NDK(Native Development Kit) on my machine and successfully compiled a C code, generated the library and ran the code on emulator.

I would like to post some issues that i had to go through while setting up the environment for compiling C code on Windows. Despite of the step-by-step procedure given here
http://mindtherobot.com/blog/452/android-beginners-ndk-setup-step-by-step/    and
http://www.pocketmagic.net/?p=1332
the cygwin setup was quite confusing for me.

Cygwin is a utility that provides Linux environment on windows, which is required to compile the C code into a library that is used by Android through jni(java native interface). To setup Cygwin go to the link and download setup.exe. Run the exe and check  to install from internet, after that set the directory where setup will be installed as C:\cygwin(recommended), store the installation files at some safe place for further use D:\cygwinInstallationFiles. A list of Packages will appear in that choose Devel package and in that select make:The GNU version of 'make' utility'.

After completing the installation, go to the directory where cygwin is istalled(C:\cygwin) open the Cygwin.bat using a text editor and paste the following code there

@echo off

set IS_UNIX=
set DEV_ROOT=D:/Work/AndroidNDK/NDK_Demo
set JAVA_HOME=C:/Program Files/Java/jdk1.6.0_01
set CLASSPATH=D:/Work/AndroidNDK/NDK_Demo/obj
set PATH=D:/android-sdk-windows/SDK/tools;D:/android-ndk-r5/android-ndk-r6b-windows/android-ndk-r6b
set ANDROID_NDK_ROOT=/cygdrive/D/android-ndk-r5/android-ndk-r6b-windows/android-ndk-r6b
set NDK_PROJECT_PATH=/cygdrive/D/Work/AndroidNDK/NDK_Demo

C:
chdir C:\cygwin\bin
bash --login -i

DEV_ROOT represents your current project's working directory(in my case it is NDK_Demo)
The project must be organized as follows:
A) The JNI part (the .c and .h and Android.mk files) in:
D:/Work/AndroidNDK/NDK_Demo /jni
B) The JAVA part (assets,bin,gen,jni,libs,obj,res,src with the .java files) in:
D:/Work/AndroidNDK/NDK_Demo
For these paths always use forward slashes.

Save the file.

Now we come to making the Android.mk file, create a file Android.mk in the jni folder and paste the following code

LOCAL_PATH := $(call my-dir)

include $(CLEAR_VARS)

# Here we give our module name and source file(s)
LOCAL_MODULE := demo
LOCAL_SRC_FILES := demo.c

include $(BUILD_SHARED_LIBRARY)

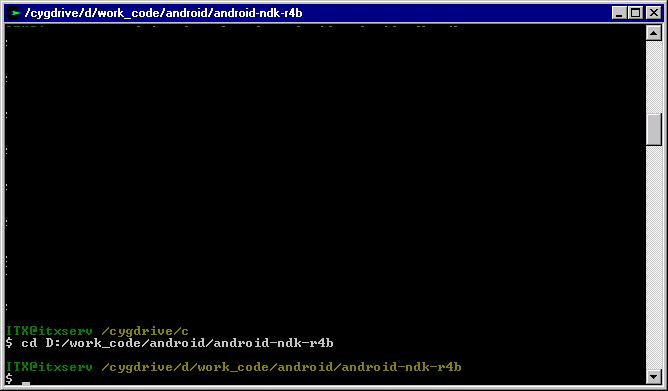
Finally Run the cygwin.bat file by double clicking it. and navigate to your project folder as shown in fig


Type ./ndk-build to compile the JNI project.
The C files have been successfully built. Now using Eclipse, you can build the Java android project, and it will include the JNI part automatically. Easy.

Hope to come back soon with some development about MAC(iPhone).